Wednesday, March 31, 2010
I will master this, I will
Well, I tried to make Croissants yesterday. The recipe I had was an 8-hour process. The author of the recipe I used didn't specify rising times (5 of them!!) so I just had to guess. The end result was not worth the 8 hours. I went looking for another recipe that does specify rising times, the last one being up to 2 1/2 hours. At various times, it gives you the option of letting them rise in the fridge overnight.
I will try again!! I *will* master this. Flambo!!
When I lived in the Baltimore Area, Jake's Bagel Bakery was the place to get Sun Dried Tomato Bagels. Oh, Honey, Me! Nice texture with big chunks of tomato in them...nice memory for this Flambo foodie.
You can't get them where I live now, so I also want to master Sundried Tomato Bagels. Recipes on the 'net are few, having found only 2, but they are a good starting point to work with. I tried to make them a few years ago, and they just weren't really that good. I will try again! Flambo!!
Seeing the picture I used, I decided that I also want to master the Hot Pretzel.
Macaroni and Un-cheese
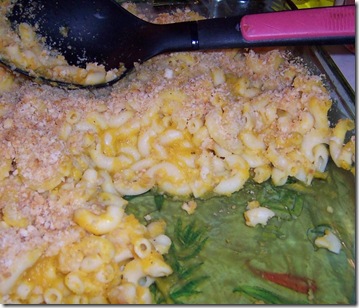
My Family loves Macaroni and Cheese. Unfortunately, tho, we are allergic to milk products, the degree of which varies from person to person. I read somewhere a suggestion of using Butternut Squash instead of cheese for Macaroni and Cheese. I was up for trying it out, so I got my Flambo on and gave it a whirl. It was a hit, especially for the ones with the worst allergies. Buddy wants me to keep this Un-Cheese sauce around so he can put it on his Pizza Bagels (topped with Hormel Turkey Pepperoni, of course).
Macaroni and Un-Cheese
1 medium sized Butternut Squash
1/4 cup margarine
1/2 cup milk substitute (I used almond milk)
salt and pepper to taste
1 lb Macaroni cooked and drained
Bread crumbs for topping
Slice squash lengthwise, remove seeds and strings. Cover with plastic wrap and microwave about 15 minutes. (This softens the squash for easy skin removal) Remove skin, cut into chunks and place in a saucepan. Add about a 2 cups of water and simmer till tender. Drain and puree till smooth. Return to saucepan, add milk, margarine, salt and pepper, stirring until margarine is melted and mixture is well blended.
Pour cooked macaroni into a large baking dish. Add squash mixture over top and mix well. Top with bread crumbs or cracker crumbs.
Bake at 400 degrees for 30 minutes. Allow to sit for about 5 minutes before serving. Scoop with your favorite Pink serving spoon. Flambo!!
Tuesday, March 30, 2010
Rhubarb Jam
My only exposure to Rhubarb was in my teen years when a nasty Rhubarb Cobbler was served up for dessert. My father loved it dearly and a look of exquisite pleasure came over his face as he took his first bite. Oh my, but that stuff put a pucker in my face and I never went near it again.
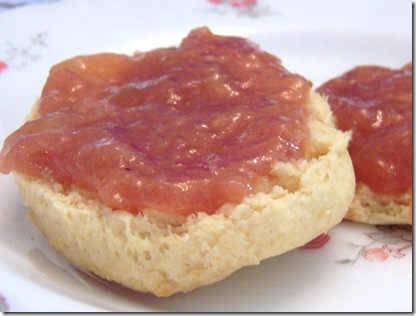
I recently learned of a skillet-made Rhubarb Jam served up with biscuits. Hmmmm. "Well, Flambo!!" I thought, "Let’s give Rhubarb another try."
Oh, Honey Me, is this jam ever wonderful!!! Now, Rhubarb is not in season, mind you, and I ended up paying $4.00 alone for the fresh Rhubarb, but it was worth it. I liked this because it was not terribly sweet, but a touch sweet and sour.
When I made this jam, I actually used 1 cup of sugar, lost my mind and put in 2 Tbl lemon juice then ended up having to thicken it a little with cornstarch. I altered the recipe in other ways, of course, and the end result was absolutely wonderful.
Rhubarb Jam
*with thanx to Rachel Ray for the base
1/2 cup sugar
1 Tbl lemon juice
4 stalks Rhubarb, peeled and sliced into 1/2 inch thick pieces , about 3 cups-ish or more.
1/4 tsp Allspice
1/2 tsp vanilla
Add sugar and lemon juice to a skillet, turn on medium heat and stir until dissolved. Add Rhubarb pieces and simmer until very thick, breaking up rhubarb pieces as they soften, about 15 minutes-ish. Add allspice and vanilla, and mix well. cool.
Make yourself a batch of biscuits, home made from your Pink and White Checkered cookbook, or your favorite store bought. Flambo!!
Friday, March 26, 2010
Mango Salsa
Mango Salsa
*thanks to Dorreta
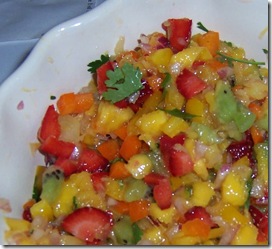
3 ripe Mangos, peeled and chopped
4-5 Kiwis, peeled and chopped
1 each of Red Bell Pepper, Orange Bell Pepper, and Yellow Bell Pepper, chopped
½ of a medium sized Red Onion, chopped
1/3 bunch fresh Cilantro, snipped with scissors ½ cup crushed pineapple, drained
Pulp from one lime
Sugar to taste—up to 1/8 cup
Combine all ingredients in your favorite serving bowl (preferably Precious Pink) and serve with tortilla chips or on Pancakes, or in a Chicken burrito….or….Get your Flambo on and experiment.
Tuesday, March 23, 2010
Home Made Ginger Ale and How to Grow Your own Ginger
Home made Ginger Ale and growing your own ginger
Monday, March 22, 2010
Vegetable Potstickers a la Flambo

Vegetable Potstickers
oil for cooking
1/2 cup sweet onion, chopped
1 tsp ground ginger
2 cups 3- color coleslaw mix, pulsed through a food processor
1 cup shredded carrot
1 Tbl dried chopped chives
1 tsp 5 chinese spice
Sea salt to taste
4 turns of freshly ground multi-color peppercorns
1/4 cup fresh cilantro, chopped
1/4 cup water
1 package of square wonton wrappers
In a large pan, add a little oil and sauté onions and garlic and ginger. Add cabbage, carrots and chives. Add seasonings and stir fry mixture until soft. Turn out into a bowl and let cool. I cooled in the refrigerator for about 15 minutes.
Add Cilantro and mix well, using your favorite Pink Spatula.
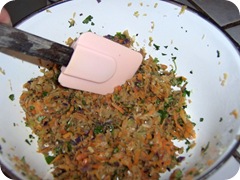
Lay out one wonton wrapper and add a little less than a tablespoonful of vegetable filling to the center.
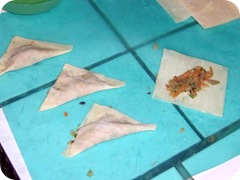
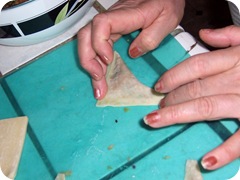
Wet the edges with water, fold over to form a triangle dumpling and press edges together. Keep bottoms flat.
Coat the bottom of a non-stick skillet* with your favorite oil and add dumplings. Mine held about 10 at a time. Cook on a medium temperature until bottoms brown.
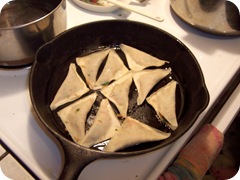
Add 1/4 cup water and quickly cover. Allow to steam until water is nearly cooked out.
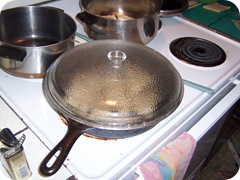
If you like both sides browned, turn the dumplings and cook for a couple more minutes, or if you like your tops just steamed, just let the water cook out. Continue cooking until bottoms get crispy again and sticks to the pot.
Remove to a plate covered with paper towels.
Enjoy.
*I do not own a non-stick skillet so I used my cast iron skillet.
Thursday, March 18, 2010
Zesty Red Potatoes and Onions
Wednesday, March 17, 2010
Beef Pot Pie Wedges
Beef Pot Pie Wedges
(makes 4)
1 lb freshly ground beef (not store ground, but a piece of a roast, with fat removed, ground in a food processor, or meat grinder. Is a different texture)
½ tsp garlic powder
4 shakes of Worcestershire sauce
Freshly ground pepper to taste
Sea salt to taste
2 cups of cooked Orzo (3/4 cup before cooking)
2 Tbl Extra virgin olive oil
½ cup sweet onion, chopped
2 cups beef broth, divided ( good quality, organic, skip the clear broths)
1/3 cup chopped frozen spinach, thawed
1 garlic clove finely chopped
Salt and pepper to taste
2 Tbl flour
1 cup mixed vegetables
1 package (2 pieces) good quality prepared pie crust. (more if you have more than 4 people to feed.)
Oven 425 degrees
In a large skillet, cook the ground beef over medium high heat, with garlic powder, Worcestershire sauce, salt and pepper. Remove from pan to a plate.
Heat olive oil in the pan, add onion and garlic. Toss in the spinach and allow to cook for a minute. Add the 2 Tbl flour, mixing well, then add about 1 cup of the beef broth, stirring to mix and thicken. Add the orzo, vegetables, ground beef, stirring to mix. Add more beef broth, as needed, stirring continually, to make a thick mixture, but not dry.
Remove from heat and allow to cool a little.
Remove 1 crust from the package, unroll it on a cutting board. Slice in half. You now have 2 half circles. Divide the meat mixture into 4 sections and place a mound of the pot pie mixture at one end, leaving a border. Fold the pastry over the mound, making a wedge, and seal the edges, crimping with a fork. Place the pot pie wedge on a baking sheet lined with parchment paper. Continue with the other pastry pieces, one at a time, as I learned the hard way that the heat from the mixture quickly melts the pastry and becomes hard to transfer. Spray tops with a cooking spray. The original directions said to bake for 10 minutes. Well, my oven laughs at 10 minute baking times so I baked these for 30 minutes, until golden brown.
Tuesday, March 16, 2010
Italian Beef
Italian Beef
1 chuck roast @ 3 lbs or more
1 sweet onion, chopped
3 cups water
1 tsp salt
1 tsp pepper
tsp basil
1 tsp onion powder
1 tsp garlic powder
1 package dry Good Seasons Italian dressing mix
Place roast in a 6-qt slow cooker. Top with onion. Combine remaining ingredients, and pour over roast. Cook on low for 8-10 hours. (Since I got a late start, I cooked on high for 6 hours) Remove meat from pot, cool if you have time. (If you wish to make the macaroni with juices recipe below, remove about 1 1/4 cups of the juices left in the slow cooker). I shredded the meat using two forks so I wouldn't burn myself (gotta keep my momma happy), then I returned the shreddd meat to the slow cooker, mixing with the juices and left it there, on low, until the rest of my dinner was ready.
I removed about 1 1/4 cup of the juices from the slow cooker and poured it into an 8-inch square pan, added probably about 4 cups cooked macaroni, stirring to mix well, topped with Parmesean Cheese and baked at 400 degrees for about 15 minutes.
This meal went over well with my ganglings and I will make it again.
Saturday, March 13, 2010
Pineapple Coconut Muffins
Pineapple Coconut Muffins
2 eggs
1/3 cup Extra Light Olive Oil
3/4 cup Coconut milk
1 8-oz can crushed pineapple, with juice
1/2 cup flaked coconut (sweetened or unsweetened)
1/2 cup macadamia nuts, chopped
2 3/4 cups muffin mix (see side bar for this)
Spray or grease a 12-cup muffin pan.
Oven temp. set for 400 degrees.
In a large mixing bowl, mix the wet ingredients. Add coconut and nuts, mixing well. Add muffin mix, stirring until just moistened. Pour batter into the muffin pan and bake for about 16-18 minutes, or until golden brown, depending on your oven. Remove from pan and cool on wire rack.
Thursday, March 11, 2010
Pink Grapefruit Meringue Pie
Pink Grapefruit Meringue Pie
9” baked pie crust
1 cup sugar
1/3 cup cornstarch
¼ tsp salt
1 ½ cups pink grapefruit juice, freshly squeezed (about 3)
¾ cup water
4 eggs, separated (whites will be used in meringue)
4 TBl butter, cut into small pieces
1 tsp grated grapefruit zest (lightly grate the skin because your pie will be *very* bitter if you go any deeper)
In a medium saucepan, combine the the sugar, cornstarch, and salt. Add the grapefruit juice and water and stir with a whisk. Add the eggs yolks and whisk until the mixture is well blended and of uniform color.
Cook over medium heat for about 5 minutes. The mixture will thicken and start to bubble. Don’t walk away from it, now, because things happen suddenly and you don’t what the bottom to burn. It should be thick enough so that it holds it’s shape when you stir it. Remove from the heat and stir in the butter and rind. The mixture color will vary, depending on the grapefruit color.
Pour into the baked pie shell and cover with plastic wrap to keep a skin from forming on the top.
Meringue
4 egg whites
¼ tsp Cream of Tartar
In a large bowl, beat egg whites and cream of tartar until soft peaks form.
Gradually add 6 Tbl sugar, 1 TBL at a time, beating on high speed until stiff glossy peaks form and sugar is dissolved. Spread evenly over hot filling, sealing edges to crust.
Bake at 350 degrees for about 15 minutes, or until meringue is golden brown. Cool on a wire rack for 1 hour. Refrigerate for at least 3 hours before serving.
Monday, March 8, 2010
Broccomoli
Broccomoli
stems from broccoli that you would buy in a rubberbanded bunch (mine came with 4 )
1 Tbl Kraft mayo
1/2 small onion, chopped
1/4 jalapeno pepper, chopped
1 tsp lemon or lime juice
1 garlic clove, chopped
1/2 roma tomato, peeled, seeded and chopped
1 Tbl fresh cilantro, chopped
salt and pepper to taste
Peel the skin from the broccoli stems. Boil in salted and peppered water until good and tender, when you've cooked most of the nutritional value out of them. Drain and cool.
Puree the cooked stems, (I used a hand mixer) Add the remaining ingredients and serve with tortilla chips. Made about 3/4 cup Broccomoli.
Sunday, March 7, 2010
What does one do with Spaghetti Squash?
What, oh, what, does one do with Spaghetti Squash?
Time to get my Flambo on and search for something interesting!
Saturday, March 6, 2010
Spanakopita
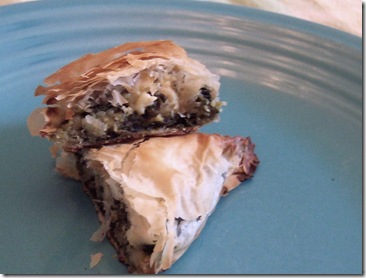
Naturally, I altered the original recipe to suit me. I just couldn’t face pouring ½ cup of oil into a pan and actually cooking anything in it. (shiver, but do as you will) My milk allergic, Autistic son saw what I was doing and asked if I would make some without cheese. I hadn’t originally intended to, but when I saw that even HE had his Flambo on, I went for it! I couldn’t believe it!!. My Autistic son wanted to try something new!!
So, here is what I did (no-cheese recipe will follow).
Addendum: I substitute a carton of goat cheese for the feta to accommodate my dairy allergic ganglings and cut the recipe in half.
Spanakopita
¼ cup Extra Virgin Olive Oil
1 large onion, chopped
2 10-oz packages frozen chopped spinach, thawed and squeezed dry
1 tsp dried dill
2 Tbl all purpose flour
2 4-oz packages feta cheese, crumbled (I used an herbed feta cheese)
4 eggs lightly beaten
Salt and pepper to taste
1 sleeve of Phyllo dough (also called Fillo, ½ of a 16-oz box)
1 stick butter, melted
Preheat oven to 350 degrees
Heat oil in a large frying pan over medium heat. Add onions, stirring frequently until tender. Mix in Spinach, dill and flour, cooking until most of remaining moisture has been absorbed. Remove from heat. Mix in feta cheese, eggs, salt and pepper.
Separate one sheet of phyllo from the stack and evenly brush a light coating of butter. Keep the remaining stack of phyllo covered with plastic wrap and a damp cloth on top of the plastic wrap to keep it from dying out.

Place another sheet of phyllo over the butter and press the two sheets together (remember to re-cover the stack of phyllo dough). Cut the layered phyllo dough into 3 long strips about 3 inches wide* (I used a pizza cutting wheel).
Place a heaping Soup spoonful of filling 1 inch from the end closest to you.
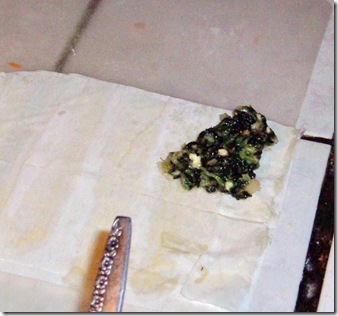
Fold one of the bottom edges over the filling to form a triangle.**

Fold the triangle up, bringing the point at the bottom right up to rest along the left edge.
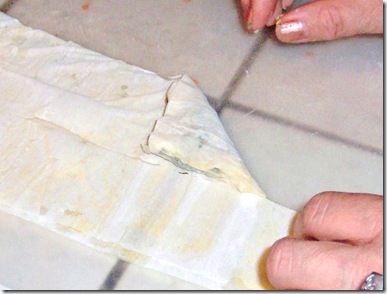
Turn the lower left corner over to touch the right edge. Continue turning the triangle over in this manner until your each the end of the phyllo.
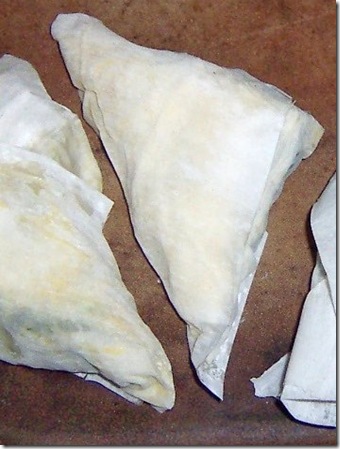
Repeat with the remaining “philling” and phyllo.
Place filled triangles on a large baking sheet. I didn’t bother to brush with butter and they were fine. Bake until golden brown, 45 minutes to 1 hour.
*Flamboyant Gourmets who prefer a larger Spanakopita triangle, just fold the phyllo sheet over once lengthwise, and add more filling!!
** I am a visual learner and used the Spanakopita folding foto from my Pink Better Homes and Gardens cook book (you know, the checkered one). I did not use that recipe, tho. Let me tell you, the filling nearly slid off once during the folding stage, but I kept my Flambo on. It was not as hard as I thought it would be.
Spanakopita without Feta
2 Tbl extra virgin olive oil
1 medium sized onion, chopped (I use red onion for flavor)
1 10-oz package frozen chopped spinach, thawed and squeezed dry
1/2 cup chopped broccoli, cooked
1/2 cup shredded carrot
1 tsp dried dill
1 Tbl flour
2 eggs, lightly beaten
Salt and pepper to taste
1 sleeve of phyllo dough
3 Tbl melted butter
Preheat oven to 350 degrees
In a large frying pan, heat oil over medium heat. Add onions, stirring frequently, until softened. Mix in Spinach, carrot, dill and flour, cooking until most of remaining moisture has been absorbed. Remove from heat. Mix in eggs, salt and pepper.
Separate one sheet of phyllo from the stack and evenly brush light a light coating of butter. Keep the remaining phyllo covered with a sheet of plastic wrap and a damp cloth on top of the plastic to keep the phyllo from drying out.
(see above fotos)
Place another sheet of phyllo over the butter and press the two sheets together. (remember to re-cover the phyllo)
Cut the layered phyllo dough into long strips about 3 inches wide.
Place a heaping Soup spoonful of filling 1 inch from the end closest to you.
(see above fotos)
Fold one bottom corner over the filling to the left edge to form a triangle.
(see above fotos)
Fold the triangle up, bringing the point at the bottom left up to rest along the left edge. Turn the lower left corner over to touch the right edge.
( see above fotos)
Continue turning the triangle over in this manner until your each the end of the phyllo.
(see above fotos)
Repeat with the remaining “philling” and phyllo.
Place filled triangles on a large baking sheet. I didn’t bother to brush with butter and they were fine. Bakeay 350 degrees until golden brown, 45 minutes to 1 hour.
Thursday, March 4, 2010
Going to try something new-Spanakopita
Neopolitan Krispie Bars
3 Tbl buttter, divided
2 cup Cocoa Krispies cereal
1/2 cup mini semisweet chocolate chips (we used Ghiradeli regular-sized chocolate chips and worked fine)
4 cups Rice Krispies cereal, divided
1/2 cup strawberry preserves
5 drops red food coloring, optional
In a large saucepan, combine a third of the marshmallows (about 2 cups) and 1 Tbl butter. Cook and stir over medium-low heat until melted. Remove from the heat; stir in cocoa Krispies and chocolate chips. Press into a greased 11 X 7 inch dish.
Once again, in a large saucepan, combine a third of the marshmallows (about 2 cups) and 1 Tbl butter. Cook and stir over medium-low heat until melted. Remove from the heat; stir in 2 cups Rice Krispies. Press into dish over chocolate layer.
Once again, in a large saucepan, combine a third of the marshmallows (about 2 cups) and 1 Tbl butter. Cook and stir over medium-low heat until melted. Remove from the heat, stir in preserves and food coloring, if desired. Press into the dish. Cut into bars.

